Zavio IP cameras now include a 32 channel NVR software package called CamGraba. The software looks very much like and has many of the same features as NUUO IP camera software. The Zavio NVR software is compatible with all Zavio camera models and runs on Windows based computers. Previous versions of Zavio NVR software were limited in only allowing users to remotely view one camera. The new CamGraba software allows 4 cameras to be remotely viewed simultaneously. The combination of the already very competitive pricing and high quality of Zavio cameras with a full features NVR software creates a great value for home, business and government customers. Here is a list of some of the major features supported:
Compatible with all ZAVIO models, including VGA, 1.3 megapixel and 2 megapixel
Remote 4-channel live view and playback simultaneously
Motion detection & scheduled recording
Supports H.264/ MPEG-4/ MJPEG compression formats
Multiple user access levels with password protection
About CCTV Camera Pros
CCTV Camera Pros is a direct supplier of security cameras and video surveillance systems for home, business and government applications. We are a US veteran owned business located in Boynton Beach, Florida. CCTV Camera Pros is a master distributor for Zavio and can assist in the design of surveillance systems for any size application. Please visit www.cctvcamerapros.com to learn more about us and the surveillance products that we supply.
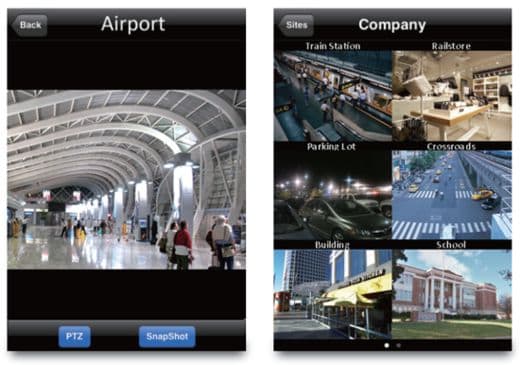
The CamGraba is new Android mobile app is now available for Zavio network IP cameras. The app is available for free to download in the Android market. The CamGraba mobile app works in conjunction with the new 32 channel CamGraba NVR software that is included with Zavio cameras. Users must run the NVR software on a Windows PC, then they can configure the CamGraba client for Android to connect to the web server of the NVR to view their Zavio IP cameras remotely over the Internet from their Android cell phone. In addition to enabling access to monitor cameras from Android, the CamGraba is a full feature NVR / IP camera software package. More details about the Zavio NVR software can be found here. Users can download the CamGraba for Windows and the Android app using the below links.
The below screen shots show the single camera and six camera view that is available in the app. When users have more that 6 cameras on their system, they can access additional views of their cameras by swiping their finger on the screen to page through the views of their cameras.
Main App Features
View up to 32 cameras in live view display at QCIF resolution
Full screen single channel live view display at CIF resolution
Support taking snapshots
Support for Physical / Digital PTZ control
Support Digital IO
In addition to Android, Zavio also plans on releasing the CamGraba iPhone app very soon. The interface will be almost identical to the Android interface. CCTV Camera Pros also has the iCamViewer iPhone app available which works with Zavio IP cameras and does not require the Windows NVR software to work. The iCamViewer connects directly to the IP camera instead of the NVR software.
About CCTV Camera Pros CCTV Camera Pros is a master distributor for Zavio located in Palm Beach, Florida. CCTV Camera Pros sells Zavio and other video surveillance equipment for home, business, and government installations. For any questions related to this article or anything related to IP or CCTV camera equipment, please contact us.
A very common problem that we hear from surveillance system users is that the iCamViewer iPhone app for security cameras is working fine on the WIFI connection at the location of the camera, but remote access over 3G or from a remote hotspot outside of their network does not work. Although we are speaking about this issue in the context of the iCamViewer mobile application, the issue is very generic and also experienced with any iPhone, iPad, Android, or other mobile application. All network surveillance products such as a IP security camera, network video server, or CCTV DVR must be configured properly with port forwarding for remote access to work. This problem is typically caused by two things.
Port forwarding is not properly setup on the router that the camera is connected to. Port forwarding allows outside Internet traffic to the surveillance camera. More details can be found here about how port forwarding works.
The IP address of the Internet connection at the location of the camera is not being used. If you are accessing your camera using an IP address that starts with 192. or 10., then you are using the LAN (local area network) IP address of the device, which will only work on the local network.
These problems are easily solved by doing the following.
Follow the instructions for your router to setup port forwarding for the port that your camera uses for remote access. A very typical default port is 80. Port forwarding instructions for some routers can be found here. If your router is not on that page, the concepts are the same to configure any router and you should be able to improvise if you have the manual for your particular model. Once you have port forwarding setup, you can use this check port forwarding tool to be sure that you did successfully set it up correctly.
Make sure you know the correct Internet IP address used at the location where your camera is. From a computer that is
on the same network as your camera, use this what is my IP address tool to verify that you know your correct WAN address.
Use the IP address obtained in the step above to configure the the client software that you are using to access your camera. In this case, the iCamViewer iPhone app can access your camera both from WIFI and 3G internet connections.
More Help Available
We hope that this article was useful in helping to troubleshoot the mobile access to your surveillance camera. If you need additional help, please post to our surveillance iPhone app forum.
At CCTV Camera Pros, it is common to receive phone calls from customers who are looking for a surveillance DVR or security camera that will support an unlimited number of remote users. These users are typically researching security camera systems for applications such as a day care that wants to allow parents to login and check on their children. For this type of application, multiple users need to be able to login to the system remotely at the same time to view cameras from the Internet. Most of the time customers that are researching these solutions have the unrealistic expectation that network-able DVRs and IP cameras can handle an unlimited number of simultaneous remote viewers. This article will discuss the hardware, software, and bandwidth constraints that make it impossible for any video surveillance system to handle an unlimited number of remote users. The variables discussed in this article apply to surveillance DVRs and security cameras (both IP and analog).
Bandwidth Limits
The first technology that limits the number of viewers supported by a camera system is Internet bandwidth. At the location where your DVR or camera is located, you need a high speed Internet connection to support remote viewing. Typically businesses use cable, DSL, or a T1 for their Internet connection. Ask your service provider what the maximum upload speed is for your Internet connection or run a speed test from a PC at the location. The upload speed is the one you want to note.
Software Limits
The second technology that limits the number of remote users supported is the software of the DVR or IP camera software. Network DVRs and IP cameras both use embedded web server software to serve video streams to client applications, web browsers, and mobile apps. Just as a web server used to host web sites is limited in the number of users that can access a web page, the web servers built into surveillance equipment limited by the number of video streams it can serve simultaneously. Users need to also consider that the software of your DVR is also performing other resource intense operations such as recording video and managing all of the configurations rules related to recording and alarms.
Hardware Limits
Last, there is the limitation of the hardware. Even the fastest supercomputers available have limits to the number of processes they can handle at any given time. Most entry and mid-level surveillance DVRs use processors equivalent to the Atom processor, like the ones use in tiny netbook computers. And again, these processors need to handle a lot of important tasks such as continuously recording multiple video streams, activating recording based on alarm events like motion detection, and allowing users to playback and export recorded video. It is easy to see why these devices are limited in the number of remote users and video streams they can serve.
Max Remote Viewers for Surveillance DVRs
When shopping for a surveillance system, keep in mind that not all DVRs and IP cameras are created equal. Higher end DVRs have faster processors and more memory. In addition, some manufacturers build better software than others. Below are a few stand alone (embedded) DVRs and PC based DVRs with varying numbers of simultaneous remote viewer support. Please note that some manufacturers limit the number of total users that can be logged in and others limit the total number of video streams that can be served.
Geovision PC based DVRs can serve 200 video channels simultaneously. So for example, if you have 5 cameras being accessed at the same time for all users, the Geovision system can support 40 simultaneous users.
If you have any questions related to remote viewing surveillance DVRs or anything else related to video surveillance, please contact CCTV Camera Pros at 561-433-8488.
Video baluns, also known as CAT5 baluns, enable security installers to use CAT5 cable to run video (and optionally power) for CCTV cameras. A video balun is placed on both ends of the CAT5 cable run and uses one of the the twisted pairs from the CAT5 cable to transmit the video from the camera to a DVR or monitor. There are also multi-camera baluns that can use the four twisted pairs in CAT5 to transmit the video for up to four cameras. Most security camera installers are familiar with using RG59 Siamese coax cable for CCTV, as this is the industry standard cable and allows installers to run both the video from the camera and power to the camera using a single cable run. There are versions of video baluns that also support running power to CCTV cameras in addition to the video. These are some of the most common reasons that a security installer would choose to use CAT-5 cable instead of RG59 for a CCTV application.
The location of the installation already has CAT5 cable pre-run and the installer wants to use it.
The distance of the cable run exceeds 700 feet (the maximum distance supported by RG59 without a video amplifier)
CAT5 cable typically costs less than RG59 Siamese
The following types of video baluns are available and used in different circumstances. Please note that you can click here to shop for the different types of CCTV video baluns discussed in this article.
Passive Video Baluns
Passive video baluns are not powered and support cable distances up to 1200 feet. These baluns use only one of the twisted pairs in the Cat5 cable. The CAT5 is attached to the baluns on both end using screw terminals or other connection types. The balun has a BNC connector that gets connected to the camera on one end and a DVR or monitor on the other. Please see the below wiring diagram, which illustrates this.
Video Baluns with Power
Video baluns with power support running low voltage power to CCTV cameras in addition to transmitting the video signal. For baluns that also supply power to cameras, one of the twisted pairs from the CAT5 cable is used for video and 2 pairs are used for power. Installers attach one pair for the positive and one pair for the negative power leads. There are also video + power baluns that use RJ-45 connectors instead of the cable terminals, and even some models that support audio as well. Some installers prefer this, especially when using pre-made network cables with the RJ-45 ends already attached. An important note is that the distance that power is unable to be run is much lower than video and is still limited by the voltage and guage of cable being used. 12V DC typically begins to drop after 200 feet. The below video demonstrates how to use passive video baluns with power.
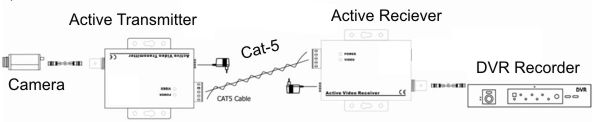
Active video baluns include a power supply and act also as an amplifier so that cable distances can be increased beyond 1200 feet (the limit for passive baluns). An active balun receiver can be used on the DVR or monitor end of the cable with a passive balun on the camera end to boost the maximum effective distance to 2000 feet. When an active transmitter balun and active receiver balun are used together, the effective distance of the cable increases to 4000 feet for color cameras and 5000 feet for black and white. The below diagram illustrates the wiring used when installing active video baluns. Please note that power is required for both the transmitting and receiving unit.
Click here for more information and pricing on active video baluns.
Multi-Camera Baluns
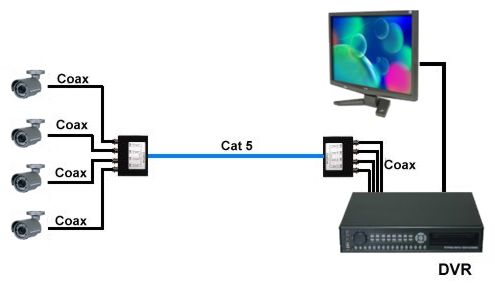
Multi-camera video baluns allow each twisted pair of a CAT5 to be used for one camera, effectively allowing an installer to run video for up to four CCTV cameras over a single CAT5. The below diagram illustrates how a multiple camera video balun is wired.
This blog article was written by Mike Haldas, co-founder and managing partner of CCTV Camera Pros. If you have any questions about video baluns or anything else related to video surveillance, contact Mike here. CCTV Camera Pros also has a support forum for video baluns to ask questions on. Click here to learn more about CCTV Camera Pros.
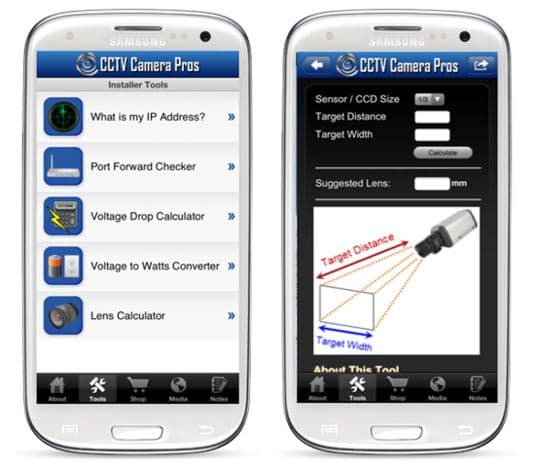
CCTV Camera Pros today announced the availability of CCTV Camera Pros Mobile App for Android. In addition to letting customers research and shop for video surveillance products from their Android phone, the app also contains valuable installation tools for security installers to use when planning and installing security camera systems. CCTV Camera Pros will be adding additional tools based on feedback and requests from users of the application. In this first release, the app contains the following online tools.
What is my IP address – allows users to quickly obtain the WAN / Internet IP address of the Internet connection that their Android device is connected to.
Port Forward Checker – allows users to test router port forwarding rules, when setting up IP cameras, network DVRs, or other network devices for remote Internet access.
Voltage Drop Calculator – used by low voltage installers to calculate AC or DC voltage drops in amps according to cable run distance and power required by the device.
Voltage to Watts Converter – allows users to convert volts, watts, and amps.
App Screenshots
The below screenshots show some of the features of CCTV Camera Pros Mobile App for Android. Please click on any of the below images to access a larger image view.
Commenting on the new mobile app for Android, CCTV Camera Pros co-founder Mike Haldas says: “I am proud that our company continues to stay on the cutting edge of technology and is able to launch exciting new projects like mobile applications for video surveillance. The feedback that we received from installers and DIY customers when we released our installer tools on the website was outstanding. Many of them requested mobile versions and we listened. Thanks to our mobile application development partner, AppBurst, we were able to quickly deploy our mobile solution. In the future, Android users can look forward to us continuing to add digital tools that assist in planning and installing surveillance cameras. We also plan on releasing an Android version of our iCamViewer which allows users to view IP security cameras from their mobile phone. Currently the iCamViewer is available for iPhone.”
About CCTV Camera Pros
CCTV Camera Pros is a direct supplier of security cameras and video surveillance systems for home, business and government. We are proudly a US veteran owned business and are located in Lantana, Florida in Palm Beach County. CCTV Camera Pros can assist in the design of IP and CCTV surveillance systems for any size application. Please visit www.cctvcamerapros.com to learn more about us and the products that we supply.
About AppBurst
AppBurst is a mobile application development company that builds iPhone, iPad, and Android mobile apps for business, events, organizations, and to promote just about anything. For more information about AppBurst, please visit www.appburst.com.
The CCTV Camera Pros research team has been thoroughly testing HD CCTV technology, including Geovision HD-SDI cards and cameras. As a master distributor of Geovision products, CCTV Camera Pros provides direct technical support to our customers and we are committed to having our team become experts on HD-SDI. HD-SDI CCTV is a fairly new technology, as far as it being used in video surveillance systems, and so far looks extremely promising as a great solution for customers that want HD video quality (1080p or 720p resolution) but do not want to manage an IP network with IP cameras. Many IP camera manufacturers will have you believe that HD-SDI will die, but we think that they are wrong. What we see in our testing so far is the same plug and play user experience that analog CCTV customers are use to, but with the benefit of high resolution video (comparable to 2-megapixel IP cameras).
Below is a screen shot that was taken while we tested a 1080p HD-SDI CCTV camera connected to a PC based Geovision DVR that was built with the GV-SDI-204 DVR card. The Geovision software is switched to a single camera view with PAP (picture-and-picture) enabled. This software feature that is built into Geovision and included with all DVR cards allows up to 3 regions to be defined within the camera view. These regions create up to three virtual camera views so sub-areas of the camera can be monitored as if they are separate cameras.
Click on image for larger view.
The 1080p resolution of the HD-SDI camera used in this test is what allows the picture-and-picture feature to work so well. Because of the high resolution, the Geovision software is able to digitally zoom into the image sub-areas and still capture a clear video image.
If you have any questions related to this article or anything related to IP or CCTV surveillance equipment, please contact CCTV Camera Pros via email at info@cctvcamerapros.net or via telephone at 561-433-8488.
CCTV Camera Pros sometimes receive inquiries from shoppers whom are looking for a solution on how to use a security camera to capture time lapse images / photographs. Some video surveillance network IP cameras have a time interval snapshot function built-in. This function allows the camera to record snapshot images to a local SD card, a network drive, or even upload images to a FTP server connected to the Internet. One manufacturer that provides this specific functionality is Zavio. The screenshots (shown below) guide a user on how to setup a Zavio IP camera to take snapshots at a preset time interval, then store these snapshots as JPEG images to a micro SD card. A few practical examples for using surveillance cameras for time lapse snapshots are:
Construction project managers that want to monitor the progress of a construction site
Wildlife enthusiasts monitoring a particular animal or plant species
Manufacturing companies that want to monitor a manufacturing processes
The camera used to take these screenshots is the Zavio F7210 HD IP camera, however, all of the latest Zavio cameras support this same setup. It is worth noting that not all IP camera manufacturers support Mac OS X.
Zavio IP cameras do support remote viewing and configuration using Chrome, Firefox, and Safari web browsers specifically, Mac OS X can be used.. Also, for people looking for a time lapse solution for CCTV cameras, Zavio makes a network video servers that will enable these same instructions to be used for closed circuit TV cameras. These instructions were tested on both Windows and Mac operating systems.
Please note that these instructions assume that your IP camera is already connected to your network and you are working from a Windows or Mac computer connected to that same network as the camera. It is also assumed that you already have a micro SD card inserted into the SD port of that camera.
First, connect to your Zavio IP camera using the web browser of your choice, then click on the configure button to access the camera main menu.
Once you are logged in, select Event Server from the menu. Select the SD card tab on the top of the screen.
On the SD card screen
a) turn the SD card on.
b) Set overwrite to on if you want the oldest images to be overwritten when the card if full or set to off if you want snapshots to stop when it is full.
c) Set the media type to snapshot.
d) Click on the save button.
Next, select Event List from the menu, then click add to define a new event.
The new event window will pop-up as seen below.
On the new event window:
a) choose a name for the event (this can be any value that you decide with no spaces allowed.
b) Turn the event on.
c) Select triggered by Periodical.
d) Choose to send the action to SD card.
e) Set the schedule to always or define a schedule if you choose.
Last, click the save button.
Your IP camera is now setup to capture JPEG snapshots at a time interval, which effectively is producing images for time lapse photography.
To download the images from the SD card, select Local Storage from the camera menu, then click on the Event link. This lets you browse the directories that contain the snapshot images.
Select any of the JPEG images and click on the download button.
In addition to supporting the ability to record time lapse snapshots to a local SD card, Zavio IP cameras also support sending the images to a network drive, and uploading images to an FTP server. If you have any questions about the instructions written in this article or anything related to video surveillance, please contact mike@cctvcamerapros.net or call 1-561-433-8488.
About CCTV Camera Pros
CCTV Camera Pros is a supplier of video surveillance equipment for home, business, and government. We are located in Lantana, Florida in Palm Beach County. We ship equipment worldwide and provide the best support and customer service in the industry. CCTV Camera Pros is a master distributor of Zavio cameras and highly recommends them for applications like the one described in this article and many others. We can be reached at 1-561-433-8488 or via email at info@cctvcamerapros.net
I recently wrote an article on the CCTV Camera Pros blog on how to use an IP camera for time lapse video photography projects. I decided to put the process documented in that article into practice by capturing a small colony of ants build a tunnel system in an Antworks space habitat. I used a Zavio F3110 network IP camera to capture 1280 x 720 resolution snapshots every 3 to 5 minutes. Zavio IP cameras can be configured to capture a JPEG image at a time interval that can be defined in minutes. I configured my camera to take a snapshot photo of the ant habitat every 5 minutes and upload the photo to the FTP server on the same web hosting server that is hosting this article (if you are reading it on the videos.cctvcamerapros.com website).
Time Lapse Video
This is the complete video that is comprised of 1546 images that were captured by the camera over the course of 4 days.
Day 1 Time Lapse
This time lapse video was being automatically generated automatically on our web server via PHP script and Javascript. I stopped the photo capture temporarily to turn the habitat around because the front was fogging up. We also noticed that web browsers would begin to use too much memory when the number of images increased too much. So, this is just the first day of images when we had the Antworks box facing forward.
The photos used in the above MJPEG video can be seen in this image gallery.
Day 2 through day 4 photo gallery
This is the rear view of the Antworks habitat. This side is not fogging up so we will leave the camera focused on this side for now.
The below network diagram documents how the image capture, upload, processing, and display basically work. If you have any questions, you can contact me here.
The sales team at CCTV Camera Pros is commonly asked “What is the best license plate recognition system?” or “What is the best license plate capture camera?”. As with any surveillance system, the best solution depends on the specific requirements of the project. For example, do you just need a camera that is capable of capturing plates clearly, or do you have more advanced requirements such as integration with a database or access control system.
The goal of this article is to educate people on important information to consider when planning an LPR camera system, in order to best decide which hardware and software components are needed for their specific situation.
The license plate capture systems that CCTV Camera Pros typically supplies fall into the two general categories as described below.
In this case, the customer requires a surveillance system with a camera that is capable of capturing license plates clearly enough so that if an event occurs, the recorded video can be reviewed and plates can be identified visually by an assigned person.
Specialized high contrast LPR cameras are designed to capture license plates by compensating for the following variables: moving vehicles, the reflective material of license plates (such as plates used in the USA), headlights, and varying outdoor light conditions. The solution we recommend consists of one high contrast black and white LPR cameras, a standard non-LPR surveillance camera to capture the color and basic overview of vehicles, and a surveillance DVR capable of recording 30 frames per second at D1 resolution (on the LPR channel).
The below diagram illustrates this setup.
In this system, the LPR-800 camera is used to capture the license plates and the BIPRO-S700VF50 CCTV camera is used to capture a color overview of the vehicle. Both cameras are hard wired to a iDVR recorder that can be configured to record continuously, on a schedule, or on motion detection. We typically recommend the iDVR for customers that prefer a stand alone / embedded DVR. For customers that prefer a Windows PC based recorder or that may require access control integration in the future, we recommend our Geovision PC based DVRs .
The LPR-800 is designed to be mounted 75 to 100 feet away from the area where the license plates are to be captured. The BIPRO-S700VF50 can be mounted 15 to 100 feet away because of the varifocal lens, which allows the installer to adjust the field of view (zoom) in and out during setup. For applications where the LPR camera needs to be mounted closer to the viewing area, the LPR-SC600HC license plate camera is also a high contrast model that is designed to be mounted 10-27 feet away from the capture area.
In this case, in addition to requiring a camera that is capable of recording license plates clearly, the customer also requires that the system be able to automatically identify license plate characters and take some type of action such as logging the plate number into a database or triggering a signal to an access control system automatically, such as opening a gate.
The process of identifying the license plate is sometimes referred to as automatic number plate recognition (ANPR) or optical character recognition (OCR).
Geovision offers an a license plate recognition / ANPR software add-on to Geovision PC based DVRs that enables the logging captured license plates to a database, triggering assigned access controls (entry gate), and even integrating with third party systems with the SDK.
In this ANPR/LPR system, we use the same cameras as in the basic LPR, but we use a Geovision PC based DVR with the optional license plate recognition software.
In addition to providing high-resolution video recording, the Geovision DVR (with the help of the optional License software) can also detects and recognize vehicle license plates via motion detection or via an input / output trigger.
Furthermore, Geovision offers an software development kit (SDK), or sometimes referred to as an API, so that software developers can integrate the license plate capture with third party systems, such as logging the plates into an external database or integrating with a third party gate entrance system.
Another way to implement an LPR system that requires ANPR / OCR or access control integration is by using a Geovision GV-DSP LPR device, which is an embedded Linux based device that can work in conjunction with a LPR camera and Geovision DVRs or it can work as a stand alone unit with just an LPR camera.
In the above example, an analog (CCTV) LPR camera is connected to a Geovision GV-DSP LPR device via RG59 coaxial cable. The GV-DSP LPR box is connected to a local network using CAT-5 Ethernet. A PC running the GV-ASmanager software (included with the GV-DSP box) can be used to manage the list of authorized license plates. Geovision NVR software can also run on the same PC that is running the GV-ASmanager software to record video from the LPR cameras and other security cameras that may be part of this system.
Important LPR System Planning Points
LPR Cameras Monitor a Single Lane of Traffic
It is very important to understand that LPR cameras are typically designed to focus on a single lane of traffic with the sole purpose of recording license plates. License plate cameras are not capable of providing both a wide-angle overview of an area with enough detail to capture license plates anywhere within that large area. This is why license plate cameras are typically used in conjunction with an overview camera that captures the overall vehicle, make, model, and color.
Here are some overview cameras we typically recommend: BIPRO-S600VF12 – Very typically used in closer proximity applications with the LPR-SC600HC high contrast LPR camera.
DPRO-AS700 – Also used in closer proximity LPR applications with the LPR-SC600HC high contrast LPR camera. This model is very similar to the BIPRO-S600VF12, but used when installer prefers a dome camera for the overview camera.
BIPRO-S700VF50 – Can be used with the longer range LPR-800 license plate recognition camera because of the larger 6-50mm varifocal lens.
Sample LPR Video
As you can see in the below video, the high contrast LPR-800 camera does a great job of capturing license plates but does not provide a good general overview of the vehicles and surrounding area. You can pause the video as a car approaches to get a clear view of the plates.
LPR camera installations require more specific mounting angles than traditional surveillance cameras. The angle at which an LPR camera is mounted must be specifically angled otherwise the plate will not be captured clearly.
About Us
CCTV Camera Pros is a direct supplier of video surveillance systems for home, business, and government applications. We have been supplying license plate recognition cameras and systems since 2006 and we ship equipment worldwide. We are a US Veteran owned business located in Lantana, Florida (Palm Beach County).
If you have questions about anything in this article or need help in planning a video surveillance system (with or without LPR capability), please contact the sales engineer team at CCTV Camera Pros. We can help plan simple systems for small businesses and residences, as well as large enterprise and government applications. We can be reached at via phone at 561-433-8488 or via email at info@cctvcamerapros.net.
This article was written by the company co-founder, Mike Haldas.
CCTV Camera Pros is pleased to announce that we have developed an exciting new tool that is available in our free mobile app for Android. A CCTV lens calculator was added to the latest version of CCTV Camera Pros Mobile App yesterday. This tool calculates and recommends CCTV camera lens sizes for installers to use based on three inputs: 1) The distance the security camera will be mounted from the target area of surveillance. 2) The width of the target area. 3) The size of the camera’s image sensor (this is typically a 1/3″ image sensor).
CCTV Camera Pros Android app already contains the following tools and we plan on adding more over time.
About Us CCTV Camera Pros is a direct supplier of video surveillance systems for home, business, and government. We strive to provide the highest level of customer service and support in the industry. CCTV Camera Pros is located in West Palm Beach, Florida and ships equipment worldwide. Please contact us if you need assistance in planning a video surveillance system. We can be reached via email at info@cctvcamerapros.net or via telephone at 1-561-433-8488.
I recently wrote an article on the misconceptions many people have with the idea of having a surveillance DVR that supports an unlimited number of remote viewing users. As a follow up to that article, I wanted to talk about an option that is available when using a Geovision PC based DVR that allows the number of supported remote viewers to be expanded by adding an additional server to the network. The research described in this article came about as a result of CCTV Camera Pros having a customer with a day care center that wanted to be able to transmit live video from CCTV cameras connected to their Geovision surveillance system to 60 parents that have children in their day care via the mobile iPhone and Android apps.
Geovision DVRs have a max concurrent remote viewing limit of 200 video channels total or 20 mobile users. In order to handle the additional 40 mobile viewers, the day care facility needed to add two additional PCs (servers) running the Geovision TwinDVR software.
The TwinDVR software is an external application included on the software CD with all Geovision DVR cards and Geovision IP cameras. The TwinDVR application helps share the network and processing load of a Geovision systems. A TwinServer setup requires at least two computers: one running the TwinServer software (this should be run on the same computer where GV-System is installed) and a TwinDVR server, which should be run on a separate physical computer that is connected to the same LAN as the TwinServer. The TwinServer sends the video streams to TwinDVR and the TwinDVR acts as the WebCam Server which serves all WebCam clients over the Internet. One TwinDVR can serve approximately 200 channels over the Internet or 20 mobile clients. Multiple TwinDVRs can be added to the network to expand further as remote viewing volume increases.
There are two ways to setup Geovision TwinServer and TwinDVR, TCP/IP mode and Multicast mode. Below are network diagrams of the two methods. Please refer to the Geovision TwinDVR / TwinServer setup document for detailed setup instructions to see advantages and disadvantages of each implementation.
TCP/IP Mode Diagram
Multicast Mode Diagram
In summary, we were very pleased to find that Geovision has a solution for users to expand the remote viewing maximum of their Geovision surveillance systems. Please keep in mind that another challenge that installers will run into is the bandwidth capacity of the Internet connection at the location of the DVRs. Please don’t expect to be able to add 5 TwinDVRs to an installation that has one DLS connection and expect to server live video to 100 concurrent users.
If you need help in planning a video surveillance system, please feel free to contact me or any member of the CCTV Camera Pros team. CCTV Camera Pros is a master distributor for Geovision and we take pride in being one of the most knowledgeable distributors in the world. If we do not know know the answer to a complex question that you have, we will help research to find out the answer.
IMPORTANT UPDATE
As of Geovision version 8.56, the Geovision TwinServer has been replaced by Mobile Server. Mobile Server is an application that can be installed on the same PC as the Geovision DVR/NVR system software that will allow unlimited number of mobile devices to connect.
About Us
CCTV Camera Pros is located in Lantana, Florida in Palm Beach County. Mike Haldas is a co-founder and managing partner of the company. You can reach Mike directly at mike at cctvcamerapros.net.
CCTV Camera Pros has launched a major update their video surveillance mobile app for Android and iOS devices. A complete redesign for the iPhone and Android versions of the app, as well as support in an HD optimized iPad version is now available to download in the Apple and Google play app stores.
Mike Haldas, co-founder and managing partner of CCTV Camera Pros, says “Version 2.0 of our mobile apps is designed around providing more value to the users of the app. We added five installer tools in the app that can assist security installers and DIY business and homeowners in planning a video surveillance system. In addition, we added a support section with setup instructions for CCTV Camera Pros iDVR (our most popular stand-alone CCTV recorder) in the app. As the adoption of mobile Internet devices over desktop and laptop computers continues to proliferate, we want our customers to be able to access information for support using the device of their choice. We are committed to moving all of our product and support information into our mobile app. The iDVR support section is the first and we plan to add sections for Zavio IP cameras, Geovision, NUUO, Vivotek, and all of the major product lines that we carry over time. We will also add additional system planning tools.”
The app currently contains the following security installer tools.
What is my IP address? – enables users to instantly find their network gateway’s IP address
Port Forward Checker – tests port forwarding rules for DVRs and network IP cameras onsite
Voltage Drop Calculator – sees if a cable is the right gauge for the distance used in the event of power issues.
Voltage to Watts Converter – easily converts between volts, watts, and amps
CCTV Lens Calculator – calculates the correct lens for a specific application using the distance from the camera to the target area and width of the target area
Please use the links below to download the iOS or Android version of CCTV Camera Pros mobile app for free.
HD-SDI CCTV cameras, also known as HD security cameras, are quickly gaining popularity as a high definition video surveillance solution. Until a few years ago, the only available option for high definition surveillance systems was to use network IP cameras which are typically more expensive and almost always more difficult to setup.
With the advent of HD-SDI technology for security cameras, users can now capture 1080p resolution video using the same RG59 or RG6 coaxial cable that is used by traditional CCTV cameras.
This new SDI platform is pivotal information for existing CCTV users whom have invested into expensive coaxial cabling installations, and now are in the market to upgrade their system to HD. These users are able to leverage their existing coax cable when they upgrade to HD Security cameras.
The HD-SDI paradigm also makes installation easier for many low voltage installers because HD-SDI security cameras follow the same plug and play processes as the traditional CCTV cameras, unlike IP cameras, which do require some level of networking knowledge to setup.
HD-SDI Camera vs. CCTV Camera Resolution
Traditional CCTV cameras are capable of resolutions up to about 704 x 480, which is referred to as D1 resolution, which is a hard limit that analog CCTV DVRs must abide by.
Some traditional CCTV cameras can actually capture slightly larger images than D1, but are unable to take advantage because traditional CCTV DVRs are limited to 704 x 480 resolution, which is why D1 is the accepted max resolution in the CCTV industry.
HD-SDI CCTV cameras are capable of true HD 1080p resolution (1920 x 1080). This higher resolution is the same as a high definition television and movies that consumers are use to. The SDI technology behind HD-SDI CCTV cameras is the same as the video cameras that capture video footage for “high def” motion pictures.
HD-SDI and CCTV Images
The following image compares the image size and resolution of a high definition HD-SDI CCTV camera and standard definition CCTV camera. Please click on the image for the full sized view. After you click on the image, if your web browser supports zooming, you will probably be able to make the image even larger.
Please click on the image for full size view
Here are the original images used in the above illustration. This high definition image was captured using a HD-B20 dome HD security camera.
Please click on the image for full size view
This is the image captures with traditional CCTV camera. A DPRO-9620 model CCTV camera was used to capture this image at D1 resolution (704 x 480).
Please click on the image for full size view
Hybrid HD-SDI CCTV DVR
A Viewtron VT-HD408 hybrid HD-SDI CCTV DVR was used to capture both images featured in this article. Viewtron hybrid DVRs will allow users to use a combination of HD-SDI and CCTV cameras on the same system. This is perfect for users with existing CCTV cameras that wish to upgrade their CCTV video surveillance to HD-SDI over time, or merely upgrade several cameras to SDI and keep their initial CCTV investment in place.
About us
CCTV Camera Pros is a direct supplier of video surveillance equipment for home, business, and government users. If you need assistance in planning a video surveillance system using HD-SDI, traditional CCTV, or network IP cameras, please call us at 1-561-433-8488 or email us at info@cctvcamerapros.net.
A common question that CCTV Camera Pros sales engineers are asked is “What is smart IR”? Smart IR is a technology built into some security cameras that adjusts the intensity of the camera’s infrared LEDs to compensate for the distance of an object so that the infrared does not overexpose the object.
Smart IR technology was invented to solve the problem of infrared LEDs whiting out images, such as people’s faces, when they are too close to the IR LEDs of a night vision camera. For example, this can easily happen if a customer purchases an infrared camera with a 65 foot IR range, but the camera is monitoring an area where people can approach the camera at a much closer distance (5 to 10 feet for example). Many infrared cameras that are available today include this technology, but not all do, so check your camera’s specification.
Smart IR Video Sample
The following video compares the night vision capability of a CCTV camera with smart IR to one without. Notice that when the man gets close to the camera, his face is still visible on the camera that uses smart IR, but is whited out on the camera that does not have it.
Smart IR vs No Smart IR Comparison
The below image compared a CCTV camera with smart IR to one without. The camera with smart IR that was used for the video capture had an infrared range up to 100 feet, but as you can see, it is able to adjust the intensity of the IR LEDs for the man that approached the camera within 3 feet.
Please click on the image for a larger view.
CCTV Camera Pros is a direct supplier of video surveillance equipment for home, business, and government use. We perform all of our own product research & development, technical support, and customer service using our expert staff of engineers located in West Palm Beach, Florida. We supply equipment world wide. If you would like help finding the best infrared camera for your application. Please contact us via phone at 1-561-433-8488 or via email at info@cctvcamerapros.net.
CCTV Camera Pros now offers 6 months no payments and no interest equipment financing through BillMeLater from Paypal. Homeowners and business owners can use BillMeLater on purchases over $99 including CCTV and network IP security cameras, complete surveillance systems, and individual system components / accessories.
Customers that want to take advantage of this program to finance a video surveillance system for their home or business can shop at www.cctvcamerapros.com and select “Checkout with Paypal” during the checkout process. Customers will then be given the option to use BillMeLater by Paypal. If the order is approved by BillMeLater (subject to credit approval), customers will have the option to pay their balance in full by the payment due date on their statement to avoid paying interest on their purchase.
To learn more about the program, please click on the below banner or start shopping now.
I have been wanting to work on a project for sometime now that involves using the digital IO ports (alarm input / output) of a network IP camera. Ditial IO is also referred to as burglar alarm in / alarm out and is one of the most underutilized and coolest functions that some IP cameras offer. This article documents the project that I completed this week using a Zavio F3110 IP camera, a simple push button momentary switch (panic button), and a very low voltage LED (2.6 volt, 28mA).
The goal of the project was to trigger an alarm input on the IP camera using the push button as a panic button and to also trigger an alarm output by turning the LED on/off. In addition, we configured the Zavio camera to also FTP upload a snapshot image to a remote server when the panic button is pressed.
Here is a picture that shows how the input and output ports of the IP camera was wired to the panic button and LED.
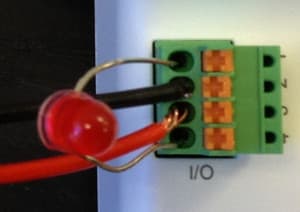
Here is a close up of the terminal block.
Here is an electrical diagram from the cameras product manual.
Please note that I did not have to use a relay relay or diode to test a simple low voltage LED, but to connect electrical devices which require more power that the camera outputs, an external relay would be required.
Digital IO Setup
Here are the settings that I made on the Zavio IP camera. As with any IP camera, I accessed the camera configuration by directly connecting to the camera in a web browser from a computer on the same network as the camera. Please note that this setup will work for all current Zavio camera models that support alarm in/out functions. Also note that the concepts described in this setup will apply to most other IP camera brands, but the setup screens will obviously be different.
After accessing the Zavio camera main menu, I select System > Digital I/O. On the digital IO screen, I set input one to grounded circuit and output one to open circuit.
I configured the alarm in / out of the camera to respond in the following way.
When the panic button is pressed, the circuit that is normally closed (grounded), momentarily opens (power is interrupted) which triggers an alarm
The alarm will cause the camera to trigger two events: a) The LED connected to the output port will close for 5 seconds (power is enabled). This causes the LED to light up. b) A snapshot will be taken by the camera and FTP uploaded to a remote server.
Alarm Event Action Configuration
The actions that the camera takes when the alarm input is triggered are configured as follows. From the camera configuration screen I select Event > Event List. This is where the two event actions are configured.
Here is the configuration of the event that triggers the digital alarm output of the camera.
Here is the alarm configuration screen that triggers the camera to FTP upload a snapshot image to a remote server.
Please note that to configure the image upload to a remote server, there is a second step which is to configure an event server. Actually, the event server must be configured before the event is created. To create an event server, click Event > Event Server. These are the settings that I used for my FTP event server.
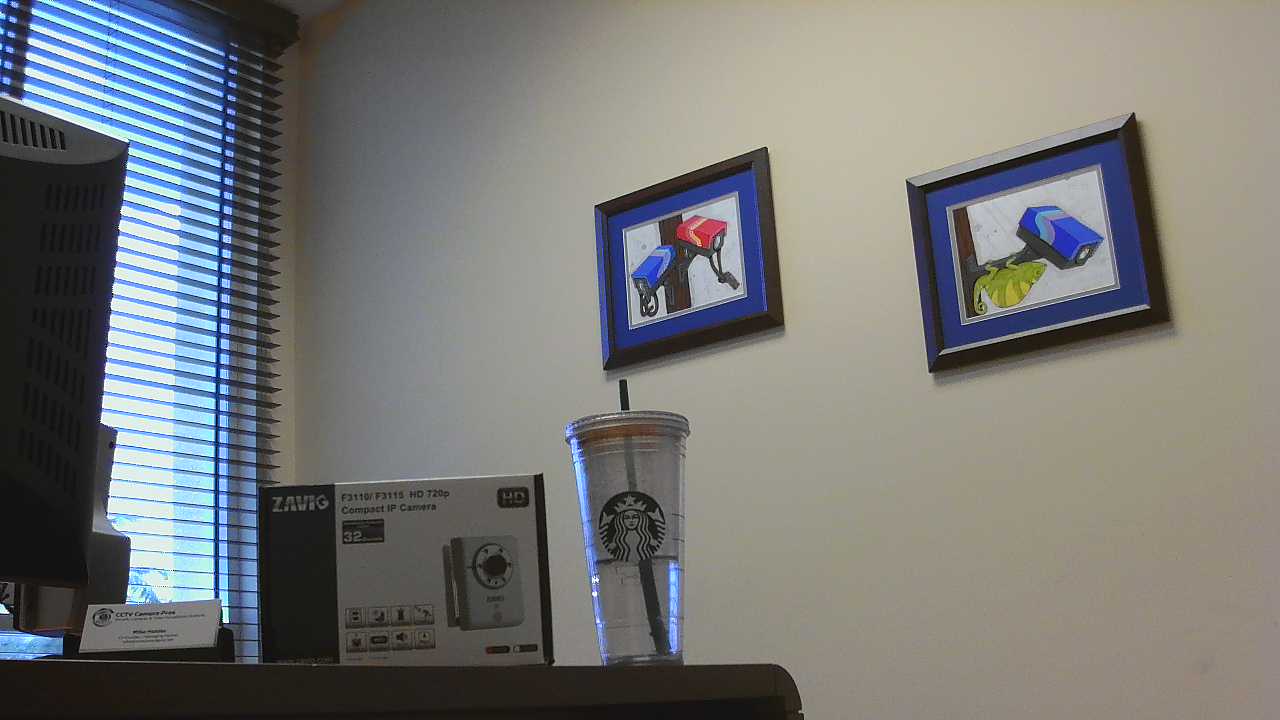
Here is one of the snapshots that was taken while we experimented with this project.
Please click for a full size view of the snapshot.
IP Camera Alarm In / Out Summary
In summary, when the panic button connected to the alarm input of the camera is pressed, an alarm is created which triggers two events. The first events causes the LED connected to the output the camera to light up for 5 seconds. The second event triggers the camera to take a 1280 x 720 snapshot and upload the image to a remote server (off-site).
A Zavio F3110 was used for this project, however the setup will be the same or very similar for the following Zavio cameras and network servers which also support digital IO. These cameras have the same firmware / software interface as the F3110 (screenshots in this article). A full line of bullet, box, dome, and cube style cameras are available with alarm in / out ports. Please visit this page to see all Zavio IP camera models with digital IO.
This is the first of many digital IO projects that I plan to do at CCTV Camera Pros. I will be adding more to this blog as I do them. If you have any questions related to this article or anything related to video surveillance, please contact me at mike@cctvcamerapros.net. You can also connect with me in various ways here.
Some Zavio IP cameras now support the ability to send push video notifications to the iPhone, iPad, and Android mobile app. Users can choose to have a photo snapshot captured instead of video if they choose. Users can also configure how the alerts are triggered. One of the most popular ways is to send a push notification when the camera detects motion. This page contains the cameras that support push notification.
This is how it works with Zavio cameras. Users configure one or more “events” in the camera settings. The event is setup to record video or take a snapshot image which is stored on the internal SD card of the camera. Cloud based IP camera viewing software (included with Zavio cameras) is configured to send a push notification to free mobile app for iPhone, iPad, and Android (works with phone and tablet devices). When the user receives the alert, the user can tap on the push notification to open the SAT viewer app. When the app opens, a live view of the camera that triggered the alert notification is displayed. The user can then select the event log for the camera to playback the video recording or view the snapshot photo of the event (depending on how the event is configured).
Users can configure their IP camera to send the push video or snapshot alert based on one or more of the following event types:
Video Motion Detection
PIR Sensor Motion Detection (built in PIR on some models)
Audio Motion Detection
Tampering Detection
Digital Input (some camera models integration with external burglar alarm input devices)
Scheduled Interval
On Camera Start-up
On Infrared Engagement
IP Change Detection
Motion Detection Push Video Notification Setup
Below is a screen shot of the event configuration screen on a Zavio IP camera where we have configured an event to record video to the internal SD card of the camera when motion detection occurs.
The second part of the setup requires the use of the free camera viewer software included with Zavio cameras, SAT Viewer. The SAT viewer is a web browser based IP camera viewing application that lets users view one or more IP cameras from Mac and Windows computers. One of the best features of the SAT viewer is that is is extremely easy to setup because no port forwarding or knowledge of networking is required. Below is a screenshot of the SAT viewer application connected to one camera.
The SAT Viewer Pro mobile app for iOS and Android lets users remotely their security cameras from iPhone, iPad, and Android phones and tablets. Users can enable notifications in the app so that when a recording event is triggered to the SD card of the camera (such as motion detection or audio detection), they receive a push notification on their mobile device. Below is a flow chart that shows the steps that occur when a user is notified of an event. These screenshots were taken from the iPhone app, however, the process is the same on the iPad and Android app.
Push Video Notification App Flowchart
The following Zavio cameras and video servers are support the SAT Viewer cloud application and push video notification feature: F3000, F3005, F3102, F3107, F3110, F3115, F3201, F3206, F3210, B5111, B7210, D3100, D3200, D5113, D5210, D7111, D7210, F7210, P5111/P5116, P5210, V1100.
About the Author
Mike Haldas is the co-founder and managing partner of CCTV Camera Pros. Mike is in charge of product research and development at CCTV Camera Pros. He can be contacted for questions about this article and anything related to video surveillance systems at mike@cctvcamerapros.net.
Some Zavio IP cameras now support the ability to backup recorded surveillance video footage to the cloud using Google Drive. Here is how it works. These Zavio cameras all have internal SD card slots and can be configured to record video to an SD card continuously, on a schedule, or triggered by an event. The cameras on that page are also all compatible with SAT Viewer.
SAT Viewer is a simple cloud based IP camera application that enables users to view their cameras from any web browser. SAT Viewer is accessed through a web browser and works on both Mac and Windows computers. Another great feature of the SAT Viewer is that it is integrated to use Google Drive as a cloud storage drive that automatically backs up video that is captured on an IP camera’s SD card.
Video footage that is stored in the cloud can be searched and played back from the SAT Viewer interface in a web browser or using the mobile app for iPhone, iPad, and Android. The below screenshot on the left shows the event list of recorded video files on the Google Drive account that is associated with this SAT Viewer account. The screenshot on the right shows the video playback that occurs when one of the videos is selected.
Mike Haldas is the co-founder and managing partner of CCTV Camera Pros. Mike is in charge of product research and development at CCTV Camera Pros. He can be contacted for questions about this article and anything related to video surveillance systems at mike@cctvcamerapros.net.
CCTV Camera Pros research and development team has recently been working on testing and documenting how to integrate burglar alarm devices with video surveillance systems using network IP cameras, CCTV DVRs, and mobile apps. You can find another post about digital IO tests here.
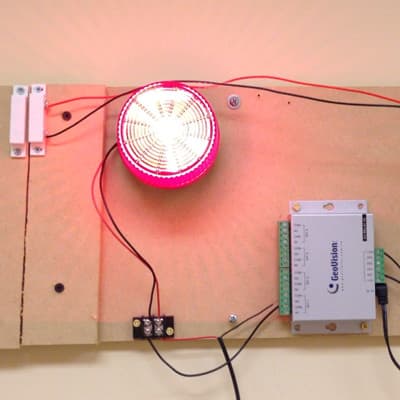
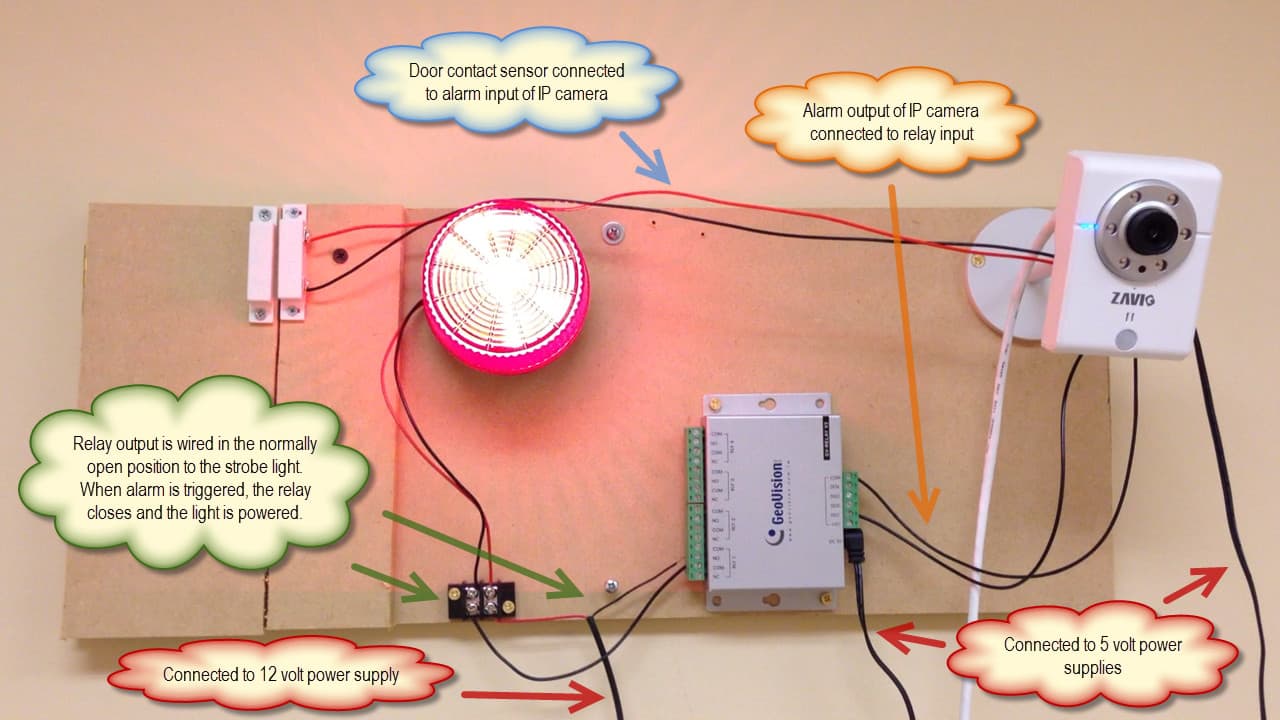
Today, I finished building a pretty useful alarm IO test panel so that our sales and support team can easily run integrating testing of burglar alarm and surveillance system devices. Right now the test panel is setup to be connect an IP camera or surveillance DVR to a door sensor, GV-Relay, and strobe light. I also integrated the digital output of Zavio IP cameras with our iCamViewer mobile app for iPhone so that a user can remotely turn the alarm output of the camera on and off. The app will be discussed more later. Please see a picture of the alarm panel below.
Surveillance System Alarm Test Panel
Please click here or on the image to view full size.
Here is how the alarm test panel works.
A magnetic door sensor is connected to the digital input of the IP camera.
When the door is opened, the sensor sends a signal to the IP camera which triggers an alarm.
The alarm of the IP camera is configured to send a signal to the camera’s digital output. This is one of many types of actions that can be taken by Zavio IP cameras with IO ports. Zavio IP cameras can also be configured to record video, take a snapshot, call an external URL, move a PTZ camera, and FTP upload an image upon alarm activation.
The digital output of the IP camera is connected to the input of a Geovision GV-Relay V2.
The output of the GV-Relay is connected in-line with the power supply and input of a strobe light. The output of the relay is wired in the normally open position (NO) which means that in the normal / non-alarm position power does not pass through it. When the alarm input of the relay is triggered, the relay output switches to the closed position, which allows power to run through it and into the strobe light. This turns the strobe light on.
Here are a few additional notes. The IP camera, GV-Relay switch, and strobe light all use their own power supplies. The digital output of the IP camera is 5 volts which is why we need a relay in between the camera and the light. The camera does not output enough power to turn the strobe light on. When an alarm is triggered by the IP camera, it sends a 5 volt signal out to the relay.
IP Cameras with Digital IO
A Zavio F3110 is currently being used on our test alarm panel, however we can switch that camera out for any Zavio camera model that has alarm input / output port(s). CCTV Camera Pros offers a full line of bullet, box, dome, and cube style cameras with alarm in / out ports. Please visit this page to see all Zavio IP camera models with alarm in/out ports.
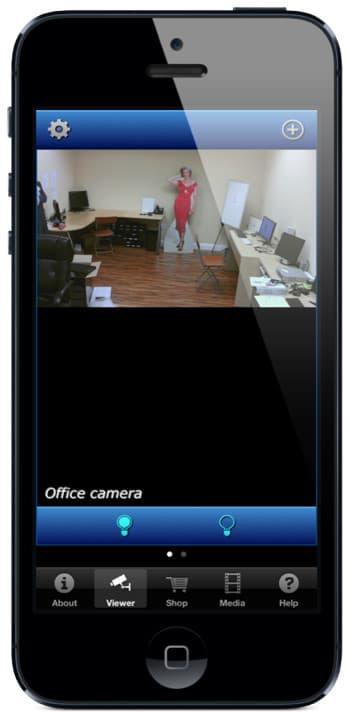
iPhone App Remote Alarm Output
Although we have not yet released the update that is required to use this feature, you can see a screenshot below of the latest version of the iCamViewer. The iCamViewer is a free iPhone app developed by CCTV Camera Pros which enables users to view IP cameras live from remotely over the Internet. The latest version of the mobile app will have the ability to trigger the digital output on Zavio IP cameras.
The controls on the bottom of the screen with the on and off light bulb turn the output of the camera on and off. So, in this case when I enable the output, out strobe light turns on.
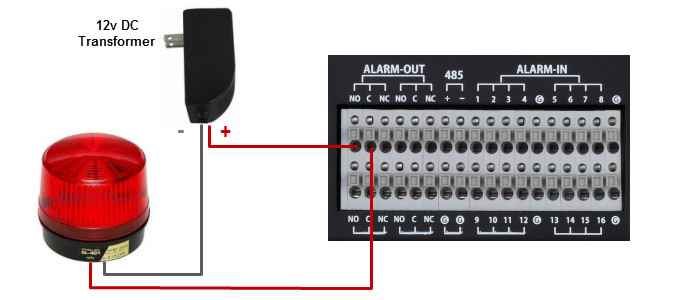
CCTV DVR Alarm Input / Output Integration
The alarm test panel pictured in this article is also used at CCTV Camera Pros to test alarm component integration with video surveillance DVRs. Because most CCTV DVRs have built-in alarm relays, the GV-relay is not needed when interfacing DVRs with alarm output devices. Here is a diagram that shows how we wired the same strobe light to a Viewtron surveillance DVR. Click here to learn more about connecting alarm devices to a surveillance DVR.
About the Author
Mike Haldas is the co-founder and managing partner of CCTV Camera Pros. Mike is in charge of product research and development at CCTV Camera Pros. He can be contacted for questions about this article and anything related to video surveillance systems at mike@cctvcamerapros.net.
 Zavio IP cameras now include a 32 channel NVR software package called CamGraba. The software looks very much like and has many of the same features as NUUO IP camera software. The Zavio NVR software is compatible with all Zavio camera models and runs on Windows based computers. Previous versions of Zavio NVR software were limited in only allowing users to remotely view one camera. The new CamGraba software allows 4 cameras to be remotely viewed simultaneously. The combination of the already very competitive pricing and high quality of Zavio cameras with a full features NVR software creates a great value for home, business and government customers. Here is a list of some of the major features supported:


 CCTV Camera Pros today announced the availability of CCTV Camera Pros Mobile App for Android. In addition to letting customers research and shop for video surveillance products from their Android phone, the app also contains valuable installation tools for security installers to use when planning and installing security camera systems. CCTV Camera Pros will be adding additional tools based on feedback and requests from users of the application. In this first release, the app contains the following online tools.


 The CCTV Camera Pros research team has been thoroughly testing HD CCTV technology, including Geovision HD-SDI cards and cameras. As a master distributor of Geovision products, CCTV Camera Pros provides direct technical support to our customers and we are committed to having our team become experts on HD-SDI. HD-SDI CCTV is a fairly new technology, as far as it being used in video surveillance systems, and so far looks extremely promising as a great solution for customers that want HD video quality (1080p or 720p resolution) but do not want to manage an IP network with IP cameras. Many IP camera manufacturers will have you believe that HD-SDI will die, but we think that they are wrong. What we see in our testing so far is the same plug and play user experience that analog CCTV customers are use to, but with the benefit of high resolution video (comparable to 2-megapixel IP cameras).
 CCTV Camera Pros sometimes receive inquiries from shoppers whom are looking for a solution on how to use a security camera to capture time lapse images / photographs. Some video surveillance network IP cameras have a time interval snapshot function built-in. This function allows the camera to record snapshot images to a local SD card, a network drive, or even upload images to a FTP server connected to the Internet. One manufacturer that provides this specific functionality is Zavio. The screenshots (shown below) guide a user on how to setup a Zavio IP camera to take snapshots at a preset time interval, then store these snapshots as JPEG images to a micro SD card. A few practical examples for using surveillance cameras for time lapse snapshots are:


 I recently wrote an article on the CCTV Camera Pros blog on
 The sales team at CCTV Camera Pros is commonly asked “What is the best license plate recognition system?” or “What is the best license plate capture camera?”. As with any surveillance system, the best solution depends on the specific requirements of the project. For example, do you just need a camera that is capable of capturing plates clearly, or do you have more advanced requirements such as integration with a database or access control system.


 I recently wrote an article on the misconceptions many people have with the idea of

 CCTV Camera Pros has launched a major update their video surveillance mobile app for Android and iOS devices. A complete redesign for the iPhone and Android versions of the app, as well as support in an HD optimized iPad version is now available to download in the

 HD-SDI CCTV cameras, also known as HD security cameras, are quickly gaining popularity as a high definition video surveillance solution. Until a few years ago, the only available option for high definition surveillance systems was to use network IP cameras which are typically more expensive and almost always more difficult to setup.


 A common question that CCTV Camera Pros sales engineers are asked is “What is smart IR”? Smart IR is a technology built into some security cameras that adjusts the intensity of the camera’s infrared LEDs to compensate for the distance of an object so that the infrared does not overexpose the object.

 CCTV Camera Pros now offers 6 months no payments and no interest equipment financing through BillMeLater from Paypal. Homeowners and business owners can use BillMeLater on purchases over $99 including CCTV and network IP security cameras, complete surveillance systems, and individual system components / accessories.
  I have been wanting to work on a project for sometime now that involves using the digital IO ports (alarm input / output) of a network IP camera. Ditial IO is also referred to as burglar alarm in / alarm out and is one of the most underutilized and coolest functions that some IP cameras offer. This article documents the project that I completed this week using a Zavio F3110 IP camera, a simple push button momentary switch (panic button), and a very low voltage LED (2.6 volt, 28mA).
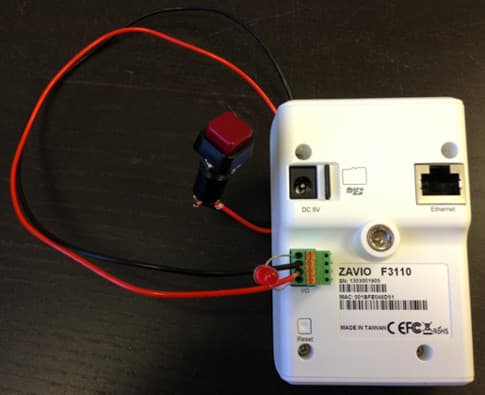


 Some Zavio IP cameras now support the ability to send push video notifications to the iPhone, iPad, and Android mobile app. Users can choose to have a photo snapshot captured instead of video if they choose. Users can also configure how the alerts are triggered. One of the most popular ways is to send a push notification when the camera detects motion. This page contains the


 Some Zavio IP cameras now support the ability to backup recorded surveillance video footage to the cloud using Google Drive. Here is how it works.